That makes no sense. SmashTV sells the same IDC connectors for 50c each, and one meter of ribbon cable for $2. How does that make Sparkfun’s one 6" cable “pretty cheap compared to Smash’s stuffs.” ?
I just started in electronics a few months ago after discovered ucapps and after understand the DIY expression. But I already searched in a lot of local electronic shops for these crimp sockets and I never found it.
Don’t go crazy trying to make single row header connectors with a pair of pliers.
Similar size crimp sockets I made with a soldering iron and with a pair of flat (~5mm width), long pliers. It’s simply, only sometimes, need more patience. Result is fine , too.
yeah, maybe a homemade crimp sockets is the solution here since I can’t find them and I would like to use crimp sockets to wire pots and other stuff such as a LCD display instead soldering it.
Those crimp sockets I presume is something made in copper, right? It can be made in other type of material? Because a got some pieces of aluminum in various thicknesses to try to make my homemade frontpanels, then maybe I can use some of these pieces to try to make my homemade crimp sockets.
Those crimp sockets I presume is something made in copper, right? It can be made in other type of material? Because a got some pieces of aluminum in various thicknesses to try to make my homemade frontpanels, then maybe I can use some of these pieces to try to make my homemade crimp sockets.
KB
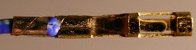
crimp sockets made in copper and soldering well.
I made in some steps :
at first cuting and soldering ribbon cable leads,but very short lenght! When heating , insulation decreases fast,
puting on working place all needed crimp sockets together in one peace, fixing it,
Never solder crimped connections! Solder cup connectors are different from crimped connectors. A properly crimped connection attaches both the copper strands and the outer sleeve to the connector.
The sleeve connection is for strain relief. If you solder a crimped connection, the solder will wick further than the strain relief, which leaves the solder soaked cable vulnerable to cracking.
This is probably not a big issue if you make gear for home use and just keep it on the table or shelf rack. For traveling with your gear, strain relief is crucial against vibration. Loose cabling inside enclosures should be tied down as well.
What’s the best/correct way of mastering the art of crimping.
The overlaps on the crimp always seem to big for the amount of plastic coating/wire they have to grip. Normally can just about get away with it but doing the brake switch and then fitting the pedal couldnt get the crimp solid enough without it coming off.
 (click for slightly larger view) is explained in detail here: